Contact Us

If you still have questions or prefer to get help directly from an agent, please submit a request.
We’ll get back to you as soon as possible.

Please fill out the contact form below and we will reply as soon as possible.

  • Contact Us
  • Home
  • Web Experiences
  • Use Cases

Add "Snooze" / "Show later" options in a Flow

Learn how to build a flow that includes an option to snooze and show later.

Written by Sofia Domingues

Updated at May 14th, 2025

Contact Us

If you still have questions or prefer to get help directly from an agent, please submit a request.
We’ll get back to you as soon as possible.

Please fill out the contact form below and we will reply as soon as possible.

  • Installation & Developers
    Installing Appcues Web Installing Appcues Mobile API & Data Troubleshooting Extras
  • Installation & Developers
    Installing Appcues Web Installing Appcues Mobile API & Data Troubleshooting Extras
  • Web Experiences
    Building Web Experiences Targeting Studio Customization & Styling Use Cases Troubleshooting FAQ
  • Mobile Experiences
    Installation & Overview Building Mobile Experiences Mobile Analytics & Integrations Troubleshooting
  • Workflows
    Building & Configuration Use Cases Workflow Analytics and Integrations
  • Account Management
    Subscription Users & Data
  • Analytics
    Experience and Event Analytics Data
  • Best Practices
    Best Practices Use Cases Pro Tips Product-led Growth
  • Integrations
    Integration Documents Use Cases Extras
+ More
  • Home

  • Installation & Developers

    • Installation & Developers

      • Web Experiences

        • Mobile Experiences

          • Workflows

            • Account Management

              • Analytics

                • Best Practices

                  • Integrations

                    This will cover how to create an option to snooze a flow through the use of custom buttons and tracked events. Following the steps in this article will allow you to add a button(s) in your flow that users can click on to have the flow shown to them at a future date dependent on your preference!

                    Build Guide

                    This use case will cover:

                    1. Build the step
                    2. Add custom buttons
                    3. Disable the skippable option
                    4. Activate the events
                    5. Targeting / Settings

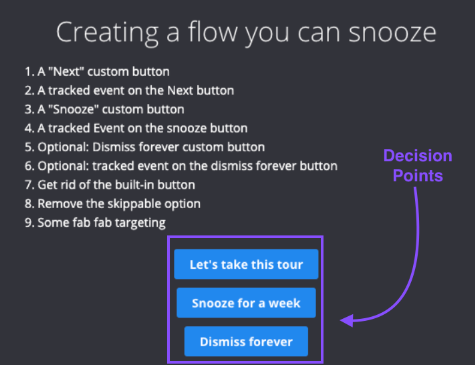
                    Step 1: Build the step

                    The main thing to set this up is creating a decision point for the user using buttons. This is accomplished with Modals, Slideouts, and Tooltips at the start of the flow that includes the flow options. From the flow patterns, you can then add the decision point for your users in the form of buttons. Example:

                    Step 2: Add custom buttons

                    Each button on the first modal, slideout, or tooltip is called a custom button that comes from selecting the 'Button' block in the Builder.

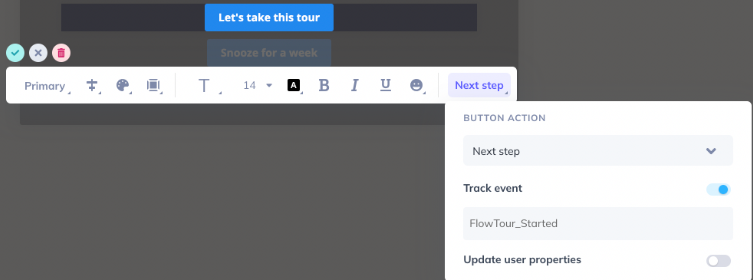
                    The "Let's take this tour" button is set up like so:

                    • Button action: Next step
                    • Track Event enabled - this will allow you to track and leverage this user action into the targeting criteria for your flow.
                    • Event name: [UniqueIdentifier_completed] - the unique identifier should be related to the flow name so you can create a snooze button for multiple flows and be able to tell the events apart. We'll be adding a name convention like "_Started" indicating that they at least started the tour.

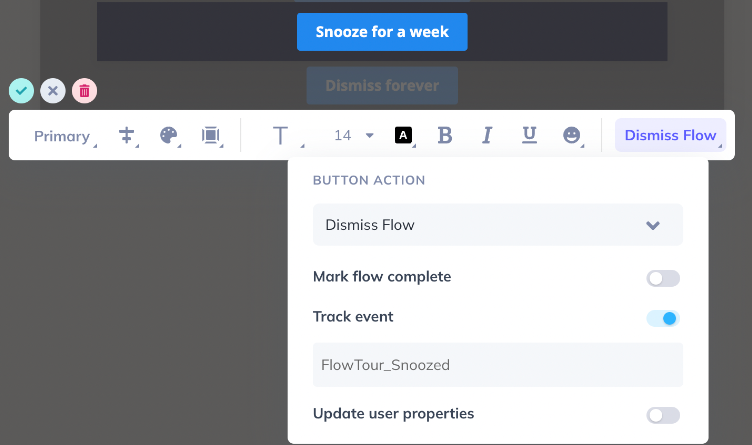
                    The "Snooze for a week" button is set up like so:

                    • Button action: Dismiss Flow
                    • Track Event enabled - this will allow you to track and leverage this user action into the targeting criteria for your flow.
                    • Event name: [UniqueIdentifier_Snoozed] - the unique identifier should be related to the flow name so you can create a snooze button for multiple flows and be able to tell the events apart. For the snooze button, we'll add a convention of "_Snoozed", indicating that they have chosen to snooze the flow. 

                    Optional: Adding a "Dismiss forever" button. This is helpful if you want to let a user never see the flow again.

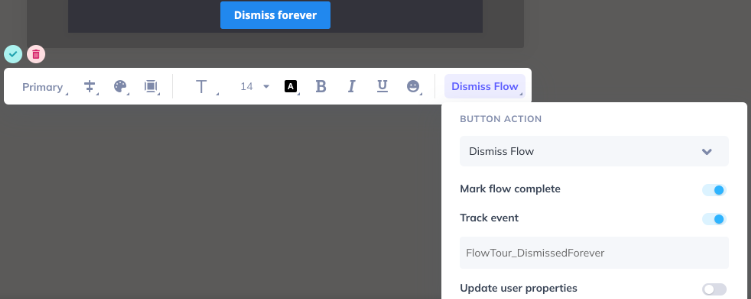
                    The "Dismiss forever" button is set up like so:

                    • Button action: Dismiss Flow
                    • 'Track Event' option enabled - this will allow you to track and leverage this user action into the targeting criteria for your flow.
                    • 'Mark flow as complete' option enabled
                    • Event name: [UniqueIdentifier_DismissedForever] - the unique identifier should be related to the flow name so you can create a snooze button for multiple flows and be able to tell the events apart. For the dismiss button, we'll add a convention of "_DismissedForever", indicating that they have chosen to dismiss this flow permanently. 

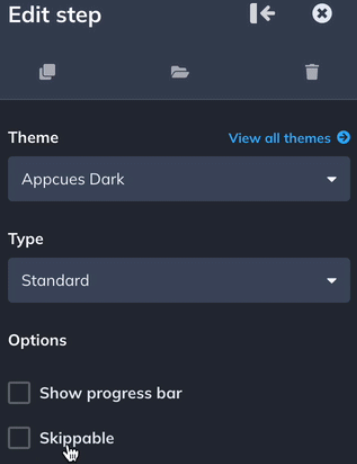
                    Step 3: Disabling the skippable option

                    Disable the "Skippable" option. We need the user to be forced to use one of the custom buttons. 

                    Step 4: Activate the Events

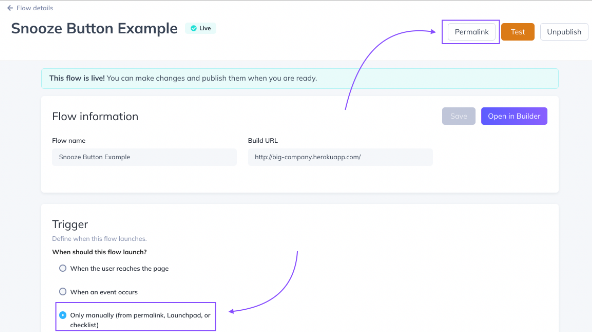
                    The events you set up won't show up for targeting until they have been done at least once. One way to activate this so we can select and see it in Studio is to set the 'Trigger' option in the flow's settings to show "Only manually" and publish the flow. Once Published, trigger the flow via permalink.

                    From there you need to activate the flow a few times, and each time select a different option. That will make each of the events trigger. (note: might take a few minutes to make the round trip and show in the targeting options... patience young Padawan.)

                    Alternatively, you can also use “Test” mode to trigger these buttons. 


                    Step 5: Target the Flow

                    After activating the events and seeing them reflected in the Events Explorer (under Application Events), you can then unpublish the flow to leverage these events.

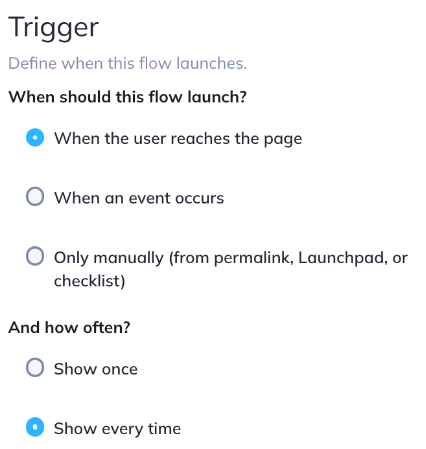
                    Change the Trigger option back to "When the user reaches page" and set it to "Show every time".

                    Then in 'Audience' Targeting, and here's the fun part, use the tracked events from the buttons to create these conditions/logic: 

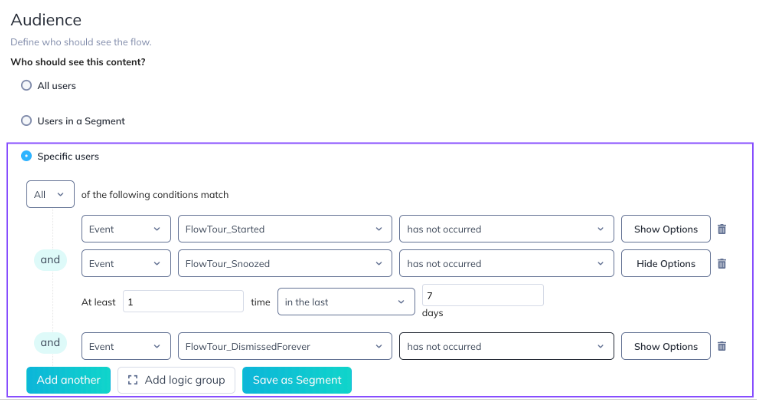
                    The flow will show until the user has clicked the "see tour" or "dismiss" button. Once the user clicks on any of those buttons, those will turn false when clicked and make the whole logic invalid, making the flow ineligible for the user.

                    If, instead, they click the "snooze" button, it turns that logic invalid too until enough time passes to be outside the "in the last X days" option, after which it turns true again and the flow will show again if they haven't clicked "see tour" or "dismiss".

                    "Dismiss forever" note: if you don't have a dismiss forever option then the targeting is the same, just without that event logic. The only way to get the flow to go away forever is to click the "see tour" option. 

                    Was this article helpful?

                    Yes
                    No
                    Give feedback about this article

                    Related Articles

                    • Welcome your Users with Appcues
                    • Welcome your Users with Personalized Paths
                    • Get Feedback from your Users with a Flow
                    • Create a Product Tour with Appcues
                    • Create a Step-by-Step Guide using Tooltips
                    DON'T TAKE OUR WORD FOR IT

                    Start building with Appcues for free

                    Try before you buy
                    No credit card required
                    Support included
                    Start building for freeBook a demo
                    or take an interactive tour
                    Appcues logo

                    Product

                    In-app messaging
                    Email
                    Push notifications
                    Workflows
                    Data
                    How it works
                    Pricing
                    What's new

                    Use cases

                    Onboarding
                    Free-trial conversion
                    Feature adoption
                    Feedback
                    Support

                    Integrations

                    Why connect
                    All integrations
                    All workflows

                    Company

                    About
                    Careers
                    HIRING
                    Why Appcues
                    Teams
                    Customers

                    Support

                    Request a demo
                    Start free trial
                    Developer Docs
                    Help Center
                    Customer Success
                    Contact

                    Resources

                    Product Adoption Academy
                    Courses
                    Workshops
                    Templates
                    Examples
                    Made with Appcues
                    The Appcues Blog
                    PLG Collective
                    Product-led Experience Report
                    The Product Experience Playbook
                    The Product-Led Growth Flywheel
                    © 2025 Appcues. All rights reserved.
                    SecurityTerms of ServiceWebsite Terms of UsePrivacy PolicyCookie Preferences
                    Expand