Installing Appcues in Mobile Applications
Guide to help you install Appcues in your mobile application

Written by Sofia Domingues
Updated at May 20th, 2025
This is a guided overview to installing Appcues Mobile into your mobile applications. Highlighted below are the shared components of the installation across our supported frameworks: iOS, Android, ReactNative, Flutter, and Ionic. For more detailed technical information please refer to the GitHub repos linked throughout.
Installation requires about an hour of work for a developer with knowledge of how your app tracks user properties, screens, and events. You will need access to your team's Appcues account to complete the installation.
Interested in our data security measures? Please review our Trust Center for details.
This guide focuses on a direct mobile installation for iOS, Android, ReactNative, Flutter, and Ionic applications. Looking to install via Segment? Check out that guide here!
Installing in a web platform? Check out our web installation guide for more info!
Before You Get Started
What Do We Mean by “Install”?
There are a few key components that together create a successful Appcues installation. While this guide will cover these items in more detail, below in a brief overview of what makes an Appcues installation:
- Add the Appcues SDK Script to your Product - Appcues is added to your app to connect to your Appcues account and show the content you've built
- Identify Users and Groups - Tell Appcues when a user is present, and send information about who that user is. This is used for targeting experiences and segmentation
- Track Screens - Recognize where the user is within your app. This is used for screen-based targeting
- Track Events - Tracking events with Appcues allows you to measure your users' engagement with your app. These events can also be used for targeting and segmentation
-
Additional Components
- Deep Link Support - Used for debugging, previewing, screen capture, and navigation across your app
- Element Recognition* - Used with Anchored Tooltips to connect a tooltip to a specific element on screen
- FrameViews* - Creates a designated container within your app to display Appcues Embeds
All components are required for full functionality and feature usage of Appcues Mobile
*Not supported on Ionic Applications
Video Overview
Ready to install? Continue through this guide for next steps!
Installing Appcues Mobile
Connecting Appcues to Your Mobile App
Required
-
Register Your App(s) in Studio
- This creates your AppIDs, which is used for connecting your app to your Appcues account for building and publishing Appcues experiences
- If you’d like to manage separate instances, you can register an AppID for each, then set the AppID for each initialization. This allows you to have isolated flows and metrics between a developer and production app instance.
Don’t have multiple instances, or don’t want to manage them in Appcues? Don’t worry! Flows can be targeted to specific users when testing live.
-
Add the Appcues SDK and Initialize
- You will need the following:
- Your Appcues Account ID, found on your Account Settings page, and
- Your registered AppID(s), found on your Installation Settings page
- Select your framework below for more details:
- You will need the following:
Identify Users and Groups
Required
- Appcues requires users to be identified to show experiences and track events. Appcues only uses the data that you explicitly send in via identify(), group(), and select integrations.
Please Note: All unique users identified by Appcues within a rolling 30-day period are considered a Monthly Active User (MAU) regardless of whether they see an experience or not. - Select your framework below for more details:
- Whether you are installing on behalf of someone or working directly within your team, we encourage you to collaborate on and follow an Installation Plan to outline which properties to include.
- For consistent user identification, it is best to call
identify()on user log in, and subsequently anygroup()calls if utilizing Group data
Identifying Users
Required
- Identify individual users via
identify() - Components of
identify()- Unique UserID (Required)
- Appcues recommends choosing opaque and hard-to-guess User IDs, such as a UUID. See the FAQ for Developers for more details about choosing a User ID
If installing on mobile and web, it’s best to use the same UserID value for both implementations’
identify()calls. This will ensure that the same user on mobile is consistent with their web activity, and maintain better MAU count reflection.If utilizing our integrations, there may be additional requirements on what the User ID needs to be for successful integration. More details on this in the Additional Information section.
- Appcues recommends choosing opaque and hard-to-guess User IDs, such as a UUID. See the FAQ for Developers for more details about choosing a User ID
- Custom User Properties (Optional)
- While technically optional, we strongly encourage that you send additional data to Appcues to allow for greater targeting options for user experiences. Lack of custom properties greatly limits your Appcues use cases.
-
If your User IDs are not easily recognizable to know who that user is, you can set a Display Identifier in Studio based on a custom user property. This does not impact your User ID, nor does this value need to be necessarily unique to each user; we recommend using Email, Full Name, or a similar property that your team will be able to easily recognize.
If installing on web and mobile, only one Display Identifier can be set for all users, so please ensure that the same property is included across all installations.
- Unique UserID (Required)
Identifying Groups
Optional
- Identify groups, or accounts, via
group() - Components of
group()- GroupID (Required)
- The Group ID should be the unique value between each group, or account, to recognize one group from another. This could be an Account ID, Account Name, etc.
If utilizing our integrations for group data, there may be different requirements on what the Group ID needs to be for successful integration. More details on this in the Additional Information section.
- The Group ID should be the unique value between each group, or account, to recognize one group from another. This could be an Account ID, Account Name, etc.
- Custom Group Properties
- The best custom Group Properties are properties that are shared between users within that group/account, and that don’t change user to user within the account (user data should be sent via
identify()) -
If your Group IDs are not easily recognizable to know which account that is, you can set a Display Identifier in Studio based on a custom group property. This does not impact your Group ID, nor does this value need to be necessarily unique to each account; we recommend using Company Name, Account Name, or a similar property that your team will be able to easily recognize.
If installing on web and mobile, only one Display Identifier can be set for all accounts, so please ensure that the same property is included across all installations.
- The best custom Group Properties are properties that are shared between users within that group/account, and that don’t change user to user within the account (user data should be sent via
- GroupID (Required)
Track Screens
Required
- Identifies which screen the user is on via
screen()which is crucial for proper experience targeting - Select your framework below for more details:
Track Events
Required
- Track your users’ interactions with your application via
track() - These events can be used for targeting, triggering (add-on), segmentation, and analytics
- Select your framework below for more details:
If installing on mobile and web, be aware that events are not separated between web and mobile automatically as events are identified by their name rather than their source.
To recognize mobile and web overlapping events separately, you can use naming conventions to accomplish this. For example, if you’d like to identify the same feature, createdDashboard, separately between mobile and web the event names might look something like:
For mobile: track(“mobile-createdDashboard”)
For web: track(“createdDashboard”)
Configure URL/Deep Linking
Required
- Deep linking is required for debugging, previewing, and screen capture. Your app must also be set up to support URL schemes and deep linking.
- Select your framework below for more details:
Installation Checkpoint
Throughout your installation, you can test and confirm successful implementation by opening the Mobile Debugger in your app using one of the following methods:
- Scan the QR code on your Studio Installation Settings page for each registered app
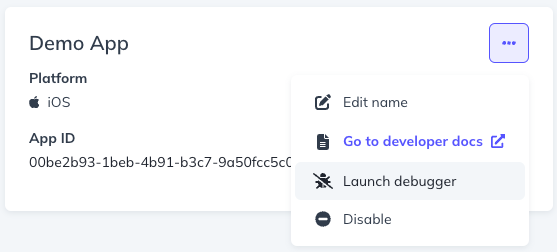
- Open the Debugger URL on the device you'd like to test
https://mobilebuilder.appcues.com/?type=debugger&appId=[AppID] - Call the
debug()function, or - Run the following through your dev console
appcues-[AppID]://sdk/debugger
We recommend checking the Debugger throughout your installation to ensure users, groups, screens, and events are being properly recognized, as well as to confirm deep linking is configured.
For Ionic Apps ONLY
If installing in an Ionic application, you’re all set!
If installing in iOS, Android, ReactNative, Flutter please proceed to implement the final two components outlined next.
Recognize Screen Elements
Required for Anchored Tooltips (excludes Ionic)
- When using Anchored Tooltips, the screen elements must be recognizable in the captured screen. This allows for secured placement that maintains through different screen sizes or element location on the screen.
Unable to use Anchored Tooltips? Check out Floating Tooltips!
- Select your framework below for more details:
Build FrameViews
Required for Embeds (excludes Ionic)
- To publish an Appcues Mobile Embed, FrameViews must be configured to store the Embed. These are pre-set containers that are added throughout your app where you would like to host an Embed.
- Select your framework below for more details:
Installation Complete!
After completing the steps outlined above, your installation is completed!
It is recommended to review your installation periodically to ensure everything is up-to-date and your custom properties, events, and FrameViews are supporting your use cases.
Additional Information
Tech Specs
iOS
- Swift SDK, using SwiftUI to render flows - open source
- Supports apps targeting iOS 13+ for rendering flows; can run on iOS 11-12 for analytics only
- Compatible with applications written in Swift or Objective-C, using UIKit or SwiftUI for the user interface
- Distributed with Swift Package Manager, Cocoapods, or as an XCFramework
- No additional dependencies are used by the SDK
- < 1 MB additional size for app download
For more on native iOS development, visit https://developer.apple.com
Android
- Kotlin SDK, using Jetpack Compose to render flows
- Supports apps targeting API 21 (Android 5.0 Lollipop)
- Supported in targetSDK 34+
- Compatible with applications written in Kotlin or Java, using Android Views or Jetpack Compose for the user interface
- Distributed through Maven Central and can be integrated through Gradle build scripts
- Uses common Android dependencies: Jetpack androidx libraries, Retrofit, Moshi, Coil - full dependency list available on Maven Central package: com.appcues:appcues
- < 5 MB additional size for app download - likely much less if common dependencies above are already in the app
For more on native Android development, visit https://developer.android.com
Sending Appcues Events to Analytics Tools
Add the Event Listener to your app to pass Appcues events into mobile-connected tools (Segment, Heap, Amplitude, Google Analytics, etc.)
- Sends the following events:
| appcues:v2:experience_started | appcues:v2:step_seen |
| appcues:v2:experience_completed | appcues:v2:step_completed |
| appcues:v2:experience_dismissed | appcues:v2:step_interaction |
| appcues:v2:experience_error | appcues:v2:step_error |
| appcues:v2:experience_recovered | appcues:v2:step_recovered |
- Select your framework below for more details:
User and Group IDs with Inbound Data Integrations
Some Appcues integrations have specific requirements to successfully connect to each other. In many cases, the Appcues User ID must exist as a value on the integration’s record/profile, keep this in mind when selecting which User ID/Group ID to send to Appcues. A breakdown of some of Appcues common integrations’ requirements are below:
-
Salesforce
- Salesforce <> Appcues: The Appcues User ID must exist as a value on the Salesforce object (Contacts, Leads, etc.)
-
HubSpot
- HubSpot >> Appcues: The Appcues User ID must exist as a value on the HubSpot record.
- Appcues >> HubSpot: The HubSpot VID or corresponding email must exist as an Appcues user property (the email can be sent via identify, from the HubSpot>>Appcues sync, or from a data source connection)
-
Marketo
- Marketo >> Appcues: The Appcues User ID must exist as a value on the Marketo record.
- Appcues >> Marketo: The Marketo Lead ID or corresponding email must exist as an Appcues user property (the email can be sent via identify, from the Marketo>>Appcues sync, or from a data source connection).
-
Heap
- Heap >> Appcues: The Appcues User ID must exist as a value on the the Heap User Profile.
-
Amplitude
- Amplitude >> Appcues: The Appcues User ID must exist as a user property in Amplitude.
-
Mixpanel
- Mixpanel >> Appcues: The Appcues User ID must match the Distinct ID of the user in Mixpanel.
-
Hightouch
- Hightouch >> Appcues: The user Id on your Hightouch model must match the Appcues User ID sent in identify().
-
Census
- Census >> Appcues: The Sync Key on your Census model must match the Appcues User ID sent in identify().
Having Issues Getting Installed?
If you have any questions or issues regarding your mobile installation, please contact us at support@appcues.com!