Contact Us

If you still have questions or prefer to get help directly from an agent, please submit a request.
We’ll get back to you as soon as possible.

Please fill out the contact form below and we will reply as soon as possible.

  • Contact Us
  • Home
  • Use Cases

Personalize the URL in a Redirect Step

Learn how to handle dynamic URLs in a redirect step in a Flow.

Written by Elijah Dove

Updated at July 3rd, 2024

Contact Us

If you still have questions or prefer to get help directly from an agent, please submit a request.
We’ll get back to you as soon as possible.

Please fill out the contact form below and we will reply as soon as possible.

  • FAQs
  • Support
  • Installation & Developers
    Installing Appcues Web API & Data Extras Troubleshooting Installing Appcues Mobile
  • Web Experiences
    Studio Building Web Experiences Customization & Styling FAQ Targeting Troubleshooting Use Cases
  • Mobile Experiences
    Building Mobile Experiences Installation & Overview Troubleshooting Mobile Analytics & Integrations
  • Account Management
    Subscription Users & Data
  • Analytics
    Experience and Event Analytics Data
  • Best Practices
    Product-led Growth Pro Tips Best Practices Use Cases
  • Integrations
    Integration Documents Extras Use Cases
  • System Status
    System Status & Incidents
  • Workflows
    Use Cases Building & Configuration Workflow Analytics and Integrations
+ More

When you're showing an Appcues flow to your users, you'll sometimes want to send them to a particular URL. Oftentimes, this URL will be the same for all your users—perhaps a path like /user/settings. Other times, you may want to send the user to a URL unique to them or a subgroup of users—say /user/12345/profile. 

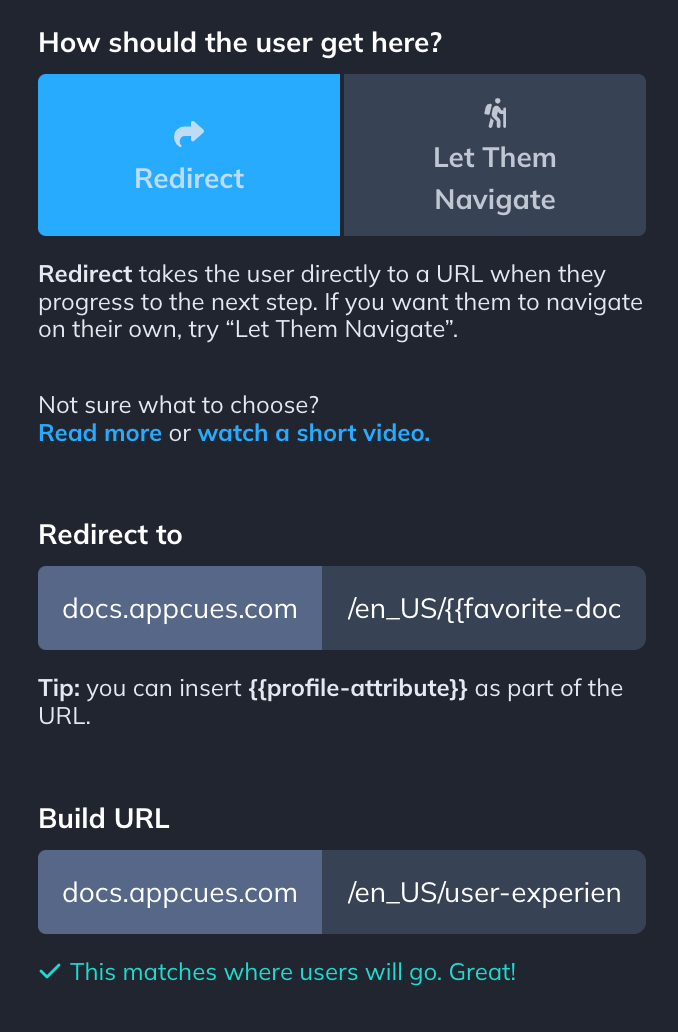
But how do you set that up within Appcues so that different users are sent to different URLs, all from within the same flow? That's where personalizing the redirect URL comes in! By adding a user attribute into the settings of a redirect step, you can create a dynamic URL pattern that will be personalized to each user. 

Let's take a look at how to set this up.

Build Guide

Step 1: Create a new flow

Create a new flow. In this example, we're creating a flow that begins on the Appcues documentation home page, guides the user to their favorite doc, and then asks them for feedback about it.

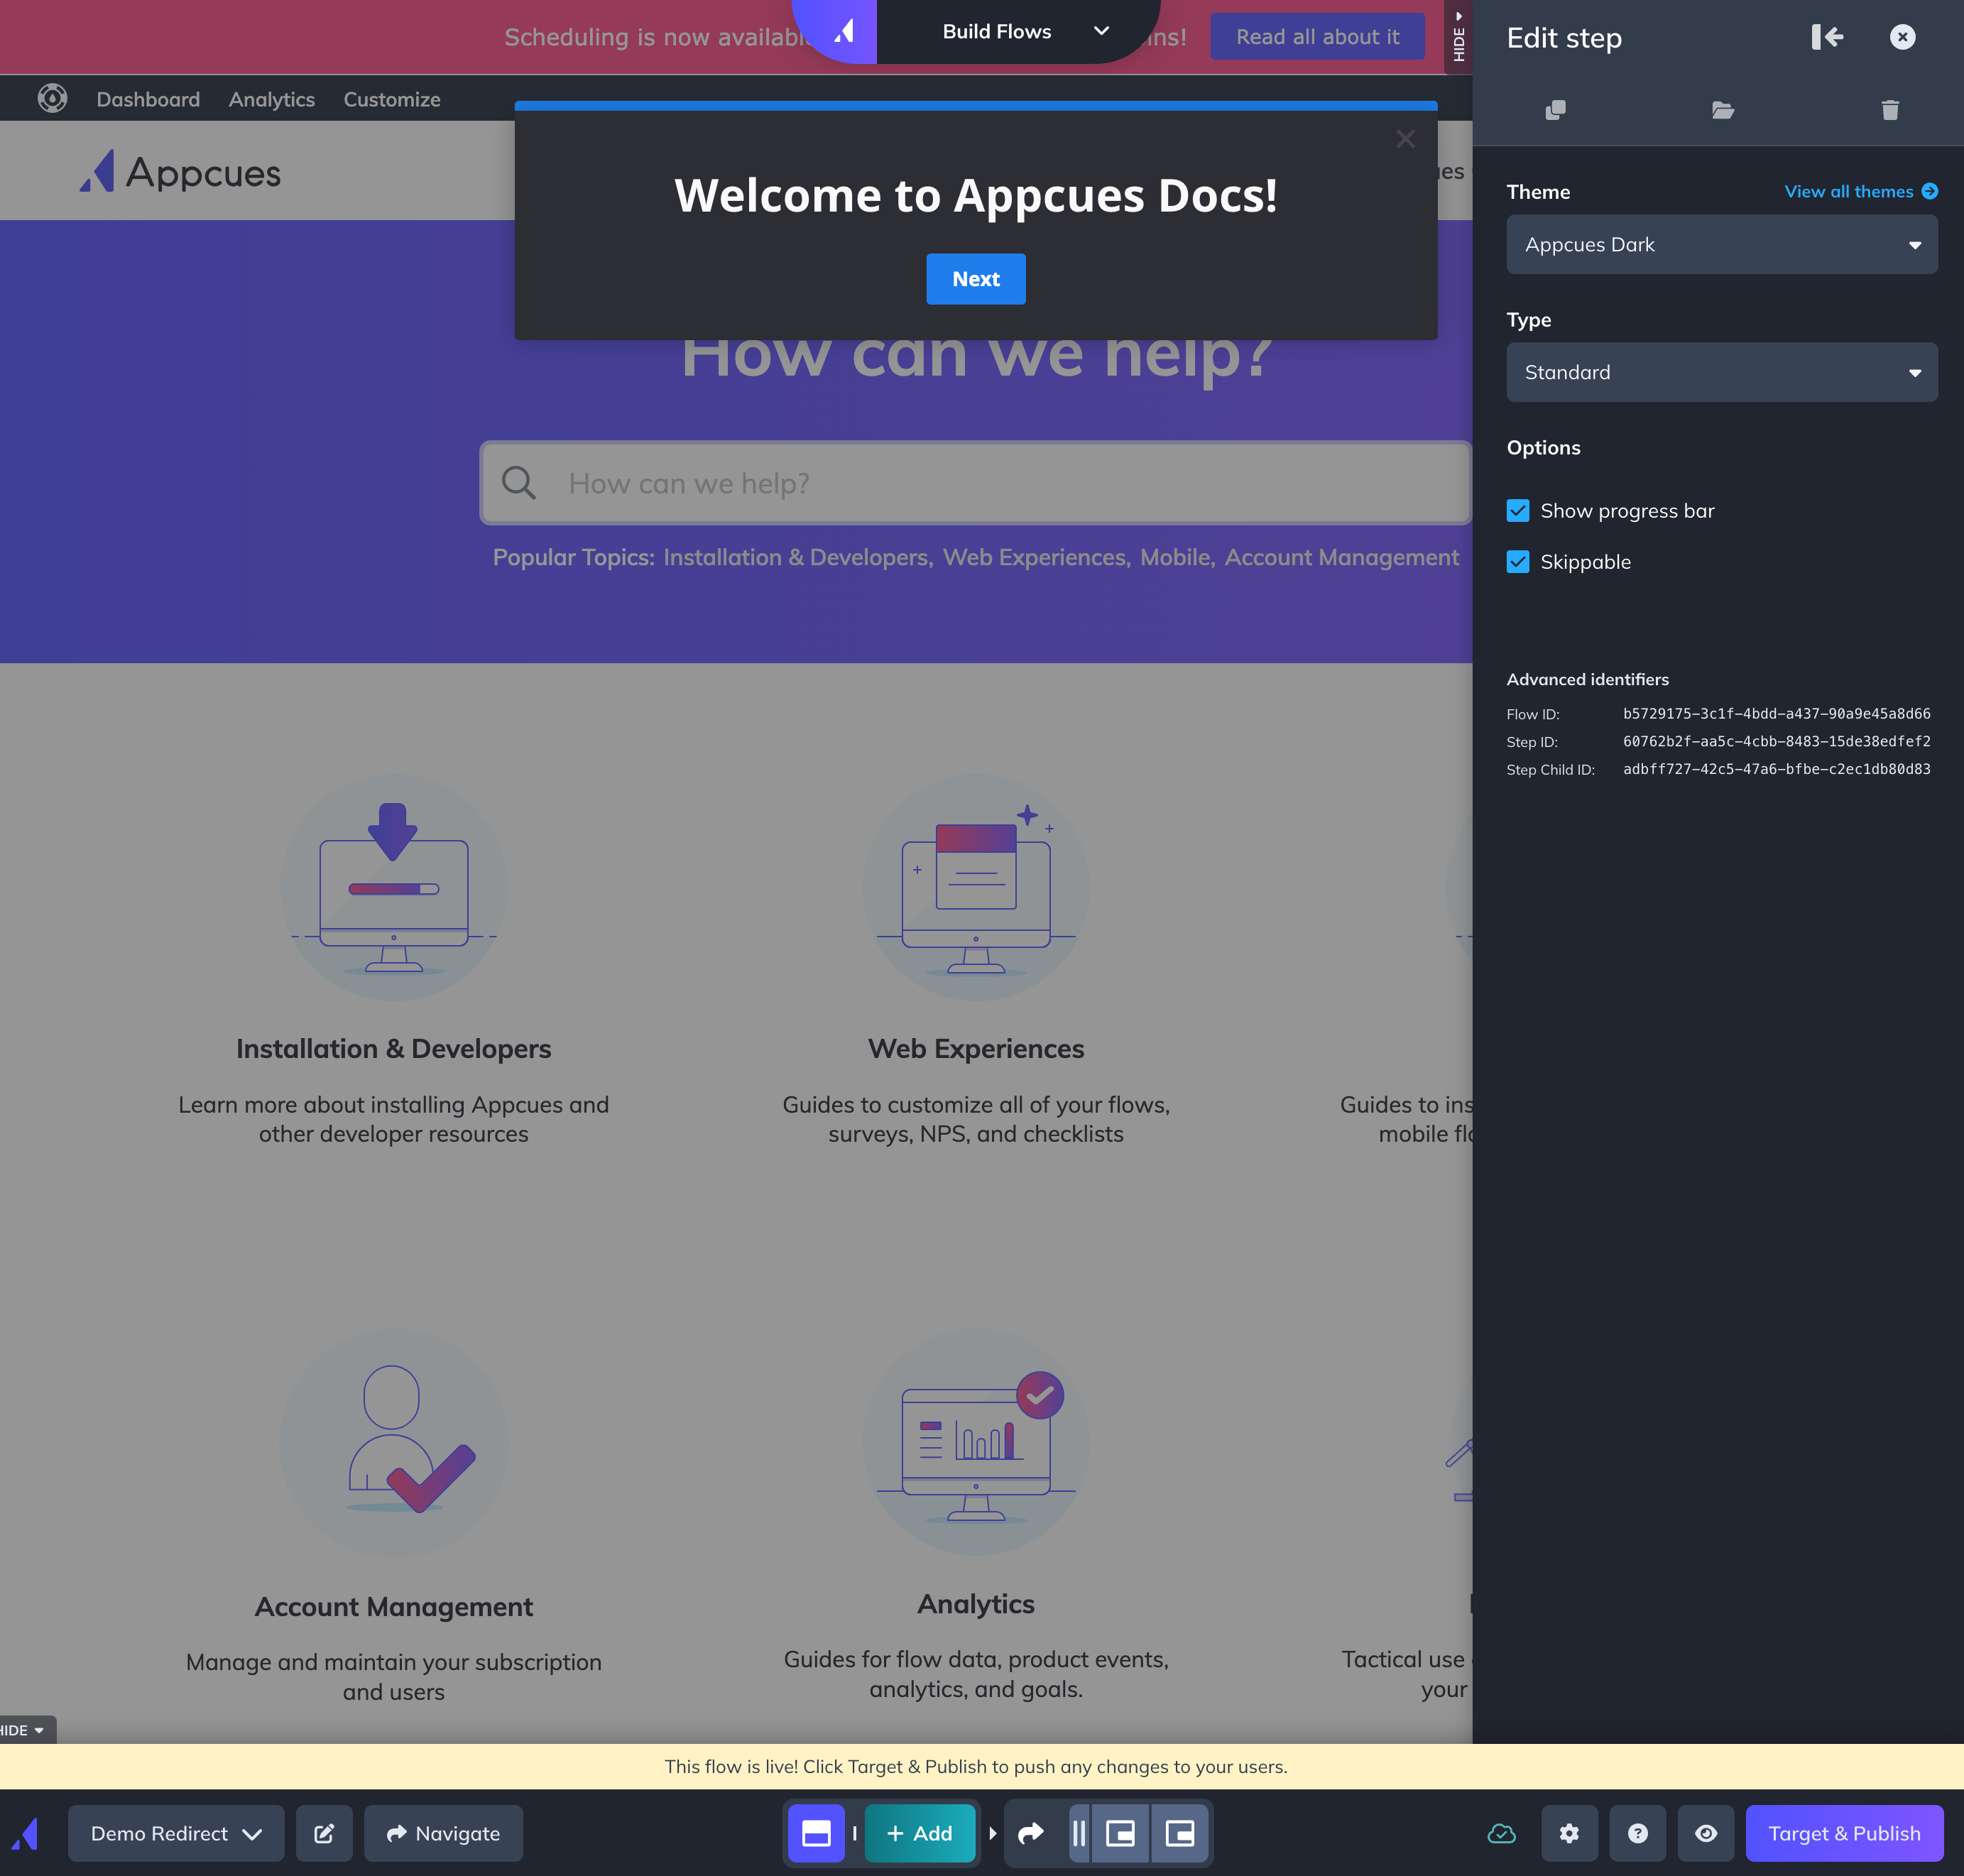
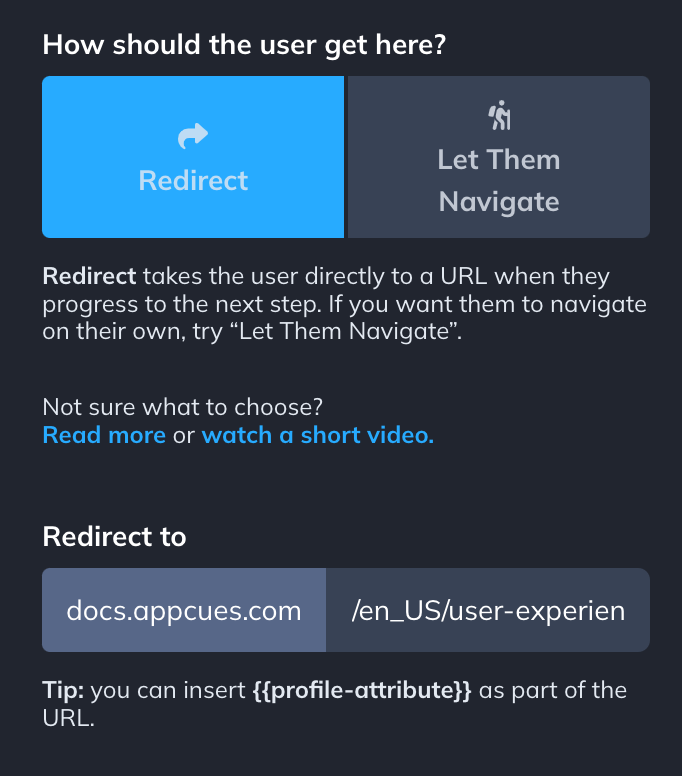
Step 2: Add the navigation step and personalize the URL

While building your flow, add a redirect step by navigating to the page where you would like to send the user and re-entering build mode. This will create a navigation step that should be set to the Redirect action by default. 

In the Redirect to URL field, change the dynamic part of the URL from the specific value to the user attribute that will be used to auto-fill this field when the flow is live. In our example flow, we're using a profile attribute called favorite-doc that contains the specific URL path for a given user's favorite documentation page.

This will cause a new field, Build URL, to populate. The Build URL is the original specific URL of the navigation step and is how the Builder knows where to build the following steps. This URL generally remains unchanged.

Once you've made those changes, be sure to save the changes on that step!

 For more on building flows across pages, check out our documentation on building flows across pages.


Step 3: Ensure the property has been added to your Appcues installation

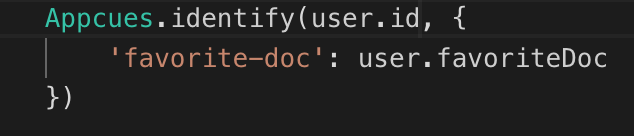
For this to work properly, you'll want to ensure that the user property being used in this redirect step has been passed into Appcues for every user that will see this flow. This is commonly done in the Appcues.identify() call of your Appcues installation, but can also be done with alternate methods such as from custom button clicks or via our public API. 

Step 4: Test it live

Publish the flow live with any pertinent page and audience targeting conditions. In order to test the personalization, this will need to be tested as a live flow, following the steps in our testing documentation.

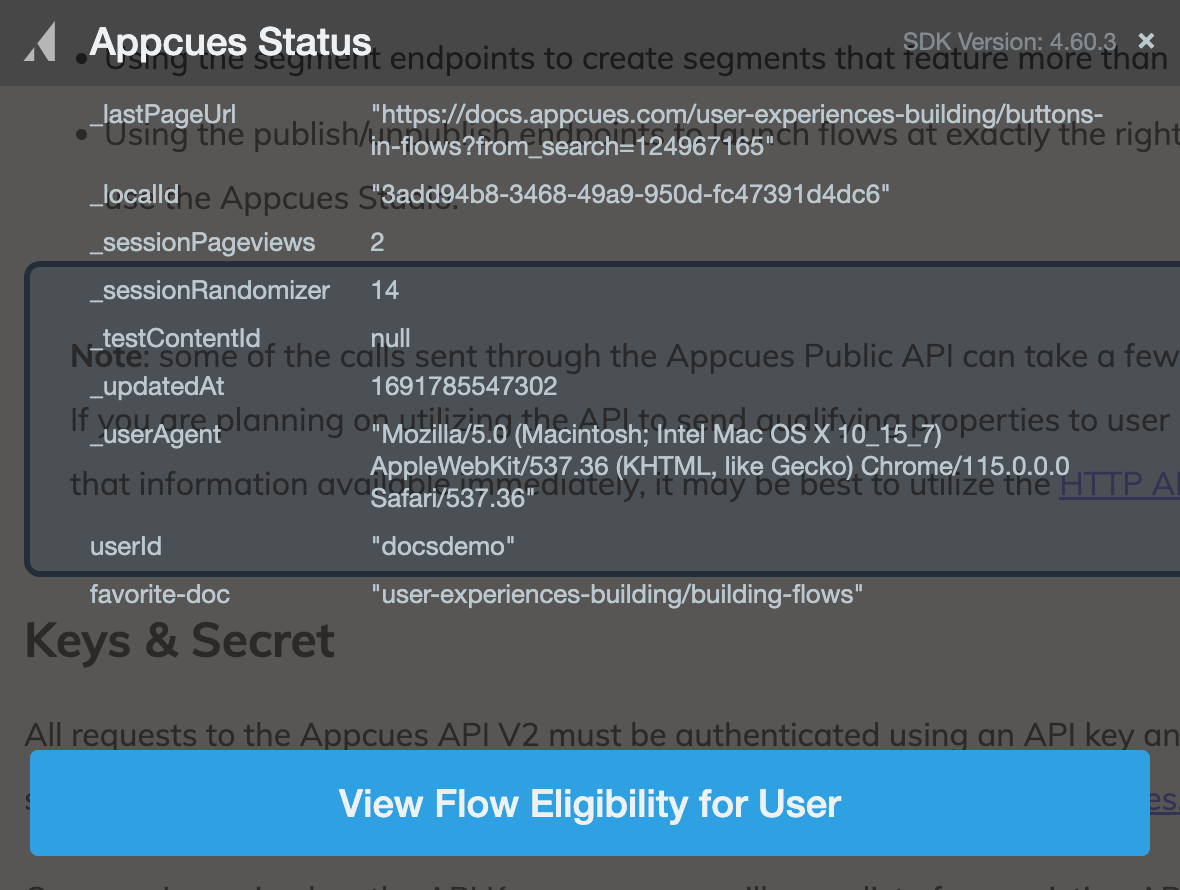
If the property has been passed in during your current session through the Appcues.identify() call, you can verify it has the value you expect by expanding the user details in the Appcues debugger.

Was this article helpful?

Yes
No
Give feedback about this article

Related Articles

  • Use a Pin for Quick Help in your Product
  • Different Types of Product Tours For New Users
  • Use the JavaScript API to Launch Flows
DON'T TAKE OUR WORD FOR IT

Start building with Appcues for free

Try before you buy
No credit card required
Support included
Start building for freeBook a demo
or take an interactive tour
Appcues logo

Product

In-app messaging
Email
Push notifications
Workflows
Data
How it works
Pricing
What's new

Use cases

Onboarding
Free-trial conversion
Feature adoption
Feedback
Support

Integrations

Why connect
All integrations
All workflows

Company

About
Careers
HIRING
Why Appcues
Teams
Customers

Support

Request a demo
Start free trial
Developer Docs
Help Center
Customer Success
Contact

Resources

Product Adoption Academy
Courses
Workshops
Templates
Examples
Made with Appcues
The Appcues Blog
PLG Collective
Product-led Experience Report
The Product Experience Playbook
The Product-Led Growth Flywheel
© 2025 Appcues. All rights reserved.
SecurityTerms of ServiceWebsite Terms of UsePrivacy PolicyCookie Preferences
Expand